Cá nhân mình đã dùng và sử dụng cho rất nhiều website của mình làm, tuy nhiên do … lười viết nên copy từ bên bạn pttuan
Hôm nay mình sẽ chia sẻ cho các bạn cách tạo các custom field sử dụng trong trang product của woocommerce.
Các custom field trong woocommerce sẽ gồm có:
- Checkbox
- Text Field
- Number Field
- Textarea
- Select
- Hidden field
- Custom field type
Cũng tương tự như custom field của wordpress, việc tạo custom field của woocommerce sẽ gồm 2 hàm, 1 hàm tạo và 1 hàm lưu dữ liệu.
Hàm tạo custom field
Để tạo custom field các bạn chỉ cần thêm hàm sau vào function của mình.
<?php
function pttuan_custom_fields() {
    global $woocommerce, $post;
    echo '<div class="options_group">';
    // Text Field
    woocommerce_wp_text_input(
        array(
            'id'          => '_text_field',
            'label'       => __( 'My Text Field', 'woocommerce' ),
            'placeholder' => 'http://',
            'desc_tip'    => true,
            'description' => __( "Mô tả của text field", "woocommerce" )
        )
    );
    // Number Field
    woocommerce_wp_text_input(
        array(
            'id'                => '_number_field',
            'label'             => __( 'My Number Field', 'woocommerce' ),
            'placeholder'       => '',
            'desc_tip'          => false,
            'description'       => __( "Mô tả của number field", 'woocommerce' ),
            'type'              => 'number',
            'custom_attributes' => array(
                    'step'  => 'any',
                    'min'   => '0'
                )
        )
    );
    // Textarea
    woocommerce_wp_textarea_input(
        array(
            'id'          => '_textarea',
            'label'       => __( 'My Textarea', 'woocommerce' ),
            'placeholder' => '',
            'desc_tip'    => true,
            'description' => __( "Mô tả của textarea", "woocommerce" )
        )
    );
    // Select
    woocommerce_wp_select(
        array(
            'id'      => '_select',
            'label'   => __( 'My Select Field', 'woocommerce' ),
            'options' => array(
                'one'   => __( 'Option 1', 'woocommerce' ),
                'two'   => __( 'Option 2', 'woocommerce' ),
                'three' => __( 'Option 3', 'woocommerce' )
                )
        )
    );
    // Checkbox
    woocommerce_wp_checkbox(
        array(
            'id'            => '_checkbox',
            'wrapper_class' => 'show_if_simple',
            'label'         => __('My Checkbox Field', 'woocommerce' ),
            'description'   => __( 'Checkbox', 'woocommerce' )
        )
    );
    // Hidden field
    woocommerce_wp_hidden_input(
        array(
            'id'    => '_hidden_field',
            'value' => 'hidden_value'
            )
    );
    // Custom field Type
    ?>
    <p class="form-field custom_field_type">
        <label for="custom_field_type"><?php echo __( 'Custom Field Type', 'woocommerce' ); ?></label>
        <span class="wrap">
            <?php $custom_field_type = get_post_meta( $post->ID, '_custom_field_type', true ); ?>
            <input placeholder="<?php _e( 'Field One', 'woocommerce' ); ?>" class="" type="number" name="_field_one" value="<?php echo $custom_field_type[0]; ?>" step="any" min="0" style="width: 100px;" />
            <input placeholder="<?php _e( 'Field Two', 'woocommerce' ); ?>" type="number" name="_field_two" value="<?php echo $custom_field_type[1]; ?>" step="any" min="0" style="width: 100px;" />
        </span>
        <span class="description"><?php _e( 'Mô tả của custom field', 'woocommerce' ); ?></span>
    </p>
    <?php
    echo '</div>';
}
Với function này bạn sẽ tạo được các custom field theo ý mình. Kế tiếp là chúng ta sẽ hook function này vào tabs mong muốn của mình.
Như các bạn đã biết thì product của woocommerce hỗ trợ các tabs data sau:
 cho woocommerce")
Nó sẽ tương ứng với các hook sau
<?php
//add_action( 'woocommerce_product_options_pricing', 'pttuan_custom_fields' ); // Phía sau trường giá
//add_action( 'woocommerce_product_options_downloads', 'pttuan_custom_fields' ); // Áp dụng cho loại sản phẩm download
// add_action( 'woocommerce_product_options_tax', 'pttuan_custom_fields' ); // Phia sau trường thuế
/*add_action( 'woocommerce_product_options_general_product_data', 'pttuan_custom_fields' );*/ // Nằm trong tabs chung

// Inventory tab
//add_action( 'woocommerce_product_options_sku', 'pttuan_custom_fields' ); // Sau trường SKU
//add_action( 'woocommerce_product_options_stock', 'pttuan_custom_fields' ); // Sau trường kho
//add_action( 'woocommerce_product_options_stock_fields', 'pttuan_custom_fields' ); // Sau trường kho và chỉ hiển thị khi được checked
//add_action( 'woocommerce_product_options_stock_status', 'pttuan_custom_fields' ); // Sau trường trạng thái đơn hàng
//add_action( 'woocommerce_product_options_sold_individually', 'pttuan_custom_fields' ); // Sau trường bán riêng
//add_action( 'woocommerce_product_options_inventory_product_data', 'pttuan_custom_fields' ); // Nằm trong tabs kiểm kê kho hàng

// Shipping tab
//add_action( 'woocommerce_product_options_dimensions', 'pttuan_custom_fields' );  //  Sau trường kích thước
//add_action( 'woocommerce_product_options_shipping', 'pttuan_custom_fields' ); // Nằm trong tabs shipping

// Linked Products tab
//add_action( 'woocommerce_product_options_related', 'pttuan_custom_fields' ); // Nằm trong tabs sản phẩm liên kết

// Attributes tab
//add_action( 'woocommerce_product_options_attributes', 'pttuan_custom_fields' ); // Nằm trong tabs thuộc tính sản phẩm

// Advanced tab
//add_action( 'woocommerce_product_options_reviews', 'pttuan_custom_fields' ); // Sau trường reviews
//add_action( 'woocommerce_product_options_advanced', 'pttuan_custom_fields' ); // Nằm trong tabs nâng cao
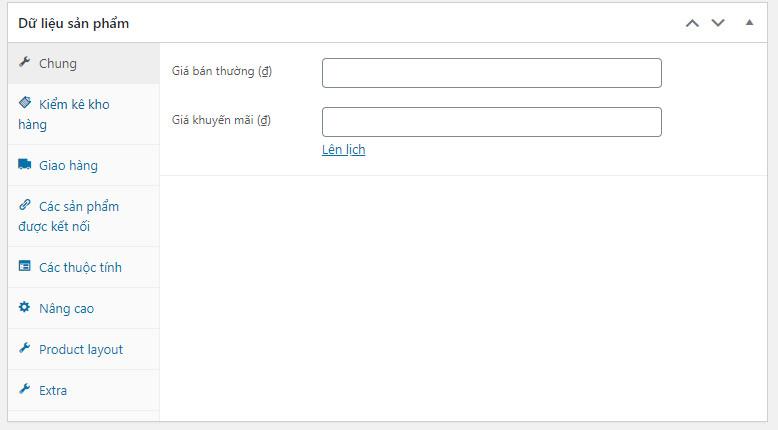
Bạn thích nó hiển thị ở đâu thì sử dụng hook tại vị trí đó, ví dụ như mình sẽ sử dụng nó ở tabs chung của product thì mình sẽ sử dụng đoạn hook này.
<?php
add_action( 'woocommerce_product_options_general_product_data', 'pttuan_custom_fields' );
Và kết quả là các field sẽ hiển thị ở đây
 cho woocommerce")
Như vậy là mình đã hoàn thành bước hiển thị các field rồi nhé, kế tiếp chúng ta sẽ lưu chúng vào database nhé.
Lưu data từ custom field của woocommerce vào database
Các bạn dán đoạn code sau vào file function nhé, các bạn lưu ý các name trong $_POST nó sẽ trùng với các name của input (Đối với custom field type) và id của các text, number, checkbox … nhé.
Còn tên trong update_post_meta sẽ là tên được lưu trong database.
<?php
function pttuan_custom_field_save( $post_id ){

    // Text Field
    $woocommerce_text_field = $_POST['_text_field'];
    update_post_meta( $post_id, '_text_field', esc_attr( $woocommerce_text_field ) );

    // Number Field
    $woocommerce_number_field = $_POST['_number_field'];
    update_post_meta( $post_id, '_number_field', esc_attr( $woocommerce_number_field ) );

    // Textarea
    $woocommerce_textarea = $_POST['_textarea'];
    update_post_meta( $post_id, '_textarea', esc_html( $woocommerce_textarea ) );

    // Select
    $woocommerce_select = $_POST['_select'];
    update_post_meta( $post_id, '_select', esc_attr( $woocommerce_select ) );

    // Checkbox
    $woocommerce_checkbox = isset( $_POST['_checkbox'] ) ? 'yes' : 'no';
    update_post_meta( $post_id, '_checkbox', $woocommerce_checkbox );

    // Hidden Field
    $woocommerce_hidden_field = $_POST['_hidden_field'];
    update_post_meta( $post_id, '_hidden_field', esc_attr( $woocommerce_hidden_field ) );

    // Custom Field
    $custom_field_type =  array( esc_attr( $_POST['_field_one'] ), esc_attr( $_POST['_field_two'] ) );
    update_post_meta( $post_id, '_custom_field_type', $custom_field_type );

}
add_action( 'woocommerce_process_product_meta', 'pttuan_custom_field_save' );
Hiển thị dữ liệu ra Frontend
Để có thể hiển thị dữ liệu từ custom field ra frontend thì các bạn có thể sử dụng 2 cách, 1 là dùng get_meta hoặc sử dụng get_post_meta đề được. get_meta được sử dụng khi bạn gọi product và get_post_meta khi bạn sử dụng post. Để hiểu hơn bạn có thể xem ví dụ dưới đây
function showdata(){
     global $post;
     $data =  get_post_meta( $post->ID, '_text_field', true );
}

function showdata(){
     global $product;
     $data = $product->get_meta( '_text_field' );
}
Như vậy là mình đã hướng dẫn các bạn cách để có thể tự thêm custom field của woocommerce vào rồi nhé. Hi vọng bài viết sẽ hữu ích cho các bạn.
Mình sẽ bonus cho các bạn 1 vd để các bạn có thể hình dung được rõ hơn tính năng của các custom field này nhé.
Ví dụ về các custom field của woocommerce đối với theme Flatsome
Ví dụ dưới đây mình sẽ tạo 1 checkbox với nội dung là quà tặng kèm, kế đó là 1 text field để chúng ta có thể điền tên món quà đó nhé.
Đầu tiên mình sẽ tạo 1 field checkbox và 1 field text bằng đoạn function sau:
<?php
function pttuan_custom_fields() {

    global $woocommerce, $post;
    woocommerce_wp_checkbox(
        array(
            'id'            => '_checkbox',
            'wrapper_class' => 'show_if_simple',
            'label'         => __('Có sản phẩm tặng kèm', 'woocommerce' )
        )
    );
    echo '<div class="text_custom" style="display:none">';
    woocommerce_wp_text_input(
        array(
            'id'          => '_text_field',
            'label'       => __( 'Tên sản phẩm', 'woocommerce' ),
            'placeholder' => 'Nhập tên sản phẩm bạn muốn tặng',
            'desc_tip'    => true,
            'description' => __( "Nhập tên sản phẩm bạn muốn tặng", "woocommerce" )
        )
    );
    echo '</div>';
    ?>
    <script>
        jQuery(document).ready(function ($) {
            if ($("#_checkbox").is(":checked")) {
                $(".text_custom").show();
            } else {
                $(".text_custom").hide();
            }
        $("#_checkbox").click(function () {
            if ($(this).is(":checked")) {
                $(".text_custom").show();
            } else {
                $(".text_custom").hide();
            }
        });
    });
    </script>
<?php }
add_action( 'woocommerce_product_options_general_product_data', 'pttuan_custom_fields' );
Chúng ta sẽ được kết quả như thế này
 cho woocommerce")
Sau đó chúng ta sẽ tiến hành lưu giá trị các field này lên database bằng function sau:
<?php
function pttuan_custom_field_save( $post_id ){
    $woocommerce_text_field = $_POST['_text_field'];
    update_post_meta( $post_id, '_text_field', esc_attr( $woocommerce_text_field ) );
    $woocommerce_checkbox = isset( $_POST['_checkbox'] ) ? 'yes' : 'no';
    update_post_meta( $post_id, '_checkbox', $woocommerce_checkbox );
}
add_action( 'woocommerce_process_product_meta', 'pttuan_custom_field_save' );
Như vậy là xong bước nhập và lưu data nhé, kế tiếp chúng ta sẽ cho nó hiển thị ra bên ngoài.
Mình sẽ lấy mẫu như thế này nhé
 cho woocommerce")
Mình sẽ gọi các field đã được lưu từ database ra rồi sau đó mình hook nó vào vị trí flatsome_product_box_tools_top nhé. Mọi người có thể tham khảo thêm các hook trong product box của flatsome tại các bài viết sau:
<?php
function giftforyou (){
    global $product;
    $checked = $product->get_meta( '_checkbox' );
    $textfield = $product->get_meta( '_text_field' );
    if ($checked =='yes'){
    $img = 'http://127.0.0.1/theme10/wp-content/themes/theme-03-child/img/gift.svg';/// các bạn chèn link hình ảnh của mình vào đây///
    echo '<img class="tooltip" title="'.$textfield.'" style="width:30px;" src="'.$img.'"/>';
};
};
add_action('flatsome_product_box_tools_top','giftforyou');
Và đây là kết quả của bạn.
 cho woocommerce")
Cái này chỉ là ví dụ thôi nhé, chứ mình thấy quà tặng kèm như thế này chưa phải là tối ưu nhất nhưng hi vọng nó sẽ giúp cho các bạn hiểu hơn về custom field của woocommerce nhé.
Hi vọng sẽ giúp ích được cho các bạn.
Nguồn: https://pttuan410.com/cach-tao-custom-field-su-dung-trong-woocommerce
Quét mã QR để đọc bài viết này để xem tiếp trên điện thoại